 |
6. Calendar Maker Dialog
|
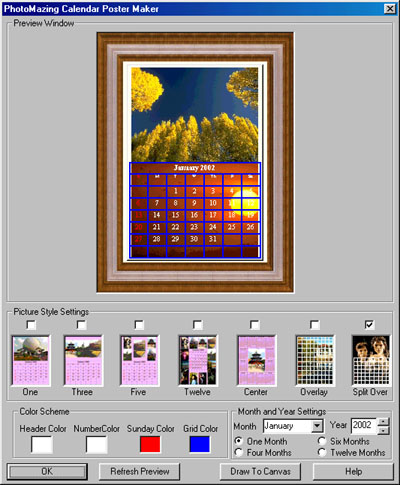
You'll find the PhotoMazing Calendar Maker is one of the simplest and fastest ways to create a custom calendar you'll ever see. All you have to do is select a calendar style and click draw to canvas. That's it! From this point, you can print your calendar or save it to disk. Unlike many other calendar makers, PhotoMazing redraws the calendar to match the canvas size you select. Therefore, you control the resolution of the calendar completely. If you want a high resolution poster calendar, simply make you canvas larger and you'll make a higher resolution calendar. Note: you must be a registered user of PhotoMazing to draw calendars larger than 800 x 600.
Preview Window
The preview window shows the current calendar style and sequence of
photos used to create the calendar. The preview layout will be either vertical (portrait)
or landscape (horizontal) to match your current canvas settings. Therefore, you should set
your canvas size and photo sequence BEFORE you create your calendar. Note: you can easily
setup your starting photo sequence by using the "Goto Picture" button on the
View Image List dialog. If you want to restrict your image list to only a select photo or
group of photos, you can erase your image list and add only the photo(s) you intend to use
by selecting the "Add Photos" button on the Toolbar ![]() to process a selected
sequence of photos or images.
to process a selected
sequence of photos or images.
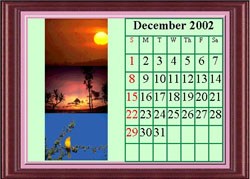
Your canvas layout has a significant impact on the positioning of photos and your calendar section. In the vertical orientation, the photos are placed on top with the calendar section on the bottom. In the horizontal orientation, the photos are placed on the left with the calendar sections on the right. Examples of the differences in orientation are shown below in the figures below.
 |
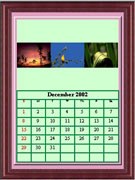 |
Notice that your photo sequence should be chosen to take optimum advantage of the layout. In the vertical example above, the photo section is better suited for vertical photo layouts as opposed to the horizontal example on the left.
Picture Style Settings
You have seven picture style layout to choose from. If you consider the portrait vs landscape option for each one, and the different moth display settings, you actually have hundreds of different layouts to choose from! To select a style click on the check box above the thumbnail or click on the thumbnail picture itself. The preview will change to reflect your selection automatically. The style options are:
ONE
One photo on top or on the left depending on your canvas layout. You can also select from a single month, four months, six months or a full calendar years display in the month section of the calendar.
THREE
Three photos on top or on the left depending on your canvas layout. You can also select from a single month, four months, six months or a full calendar years display in the month section of the calendar.
FIVE
Five photos on top or on the left depending on your canvas layout. You can also select from a single month, four months, six months or a full calendar years display in the month section of the calendar.
TWELVE
This is a yearly layout when twelve photos are used to line the border of the calendar. Calendar month settings are ignored for this setting.
CENTER
This is a yearly layout when twelve months are used to line the border of the calendar. A single picture is centered in the calendar. Calendar month settings are ignored for this setting.
OVERLAY
A single picture is stretched to the canvas. The calendar month settings are drawn transparently over the picture. You can also select from a single month, four months, six months or a full calendar years display in the month section of the calendar. Note: use your color scheme to achieve the best results and color contrasts.
SPLIT OVER
Two pictures are mounted on top and bottom or left and right and stretched to the canvas. Calendar month settings as overlaid on the bottom or right of the canvas. The calendar month settings are drawn transparently over the picture. You can also select from a single month, four months, six months or a full calendar years display in the month section of the calendar. Note: use your color scheme to achieve the best results and color contrasts.
Color Scheme
You are in complete control over your color settings. Be careful here: using the same background color as any of these color settings will cause them to disappear!
Header Color
The color used for the month and year description and the days of the week. Note: the Sunday column has it's own color setting which may override this one.
Number Color
The color setting used in displaying the days of the month. Note: if the day falls on a Sunday, the Sunday column has it's own color setting which may override this one.
Sunday Color
Settings for the header and days of the month that fall on Sunday.
Grid Color
The color of the lines used to draw the boxes around the calendar months.
Month and Year Settings
These setting will require you to click on the Refresh Preview button to see the effects.
Month
Select the starting month for your calendar from January through December.
Year
Select your calendar year of interest.
One Month
A single month layout based on your year and starting month setting.
Four Months
A your month layout starting with the Month selection. If the four month span extends past the end of the year, the next year is automatically incremented.
Six Months
A six month layout starting with the Month selection. If the six month span extends past the end of the year, the next year is automatically incremented.
Twelve Months
A twelve month layout starting with the Month selection. If the twelve month span extends past the end of the year, the next year is automatically incremented.
Main Dialog Buttons