2. Canvas Layout
and Additional Options
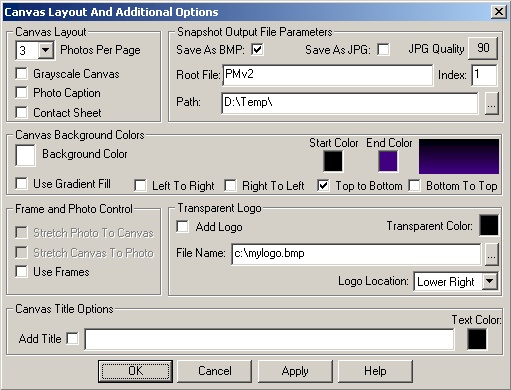
This dialog has several features which will impact the
final appearance of your photo canvas creation. The options are divided into five main
groups and are described below. If the detailed explanations are unclear, use the Apply
button to see what the effect of any change here might be.
Canvas Layout
- Photos Per Page - click on this control
to select between 1 and 36 photos to display per canvas snapshot. Each photo is
automatically resized to fit in an optimum slot on the display grid. Perfect aspect ratio
is maintained regardless of each photo size! Note: not all numbers in this range are
available. Your choices are 1, 2, 3, 4, 5, 6, 7, 8 , 9, 12, 16, 20, 25, 30, and 36.
- Background Color - click on the color
square to display a standard color selection dialog for the canvas background. This color
is used inside and outside of frames and in cases where the photo(s) do not occupy the
entire canvas.
- Photo Caption - click on this
button to display or remove the file name of the photo below each picture.
- Contact sheet - a contact sheet is
simply a canvas layout of multiple pictures with a photo caption below each photo. Click
this button to set the default contact sheet settings to 16 photos per canvas, use frames
= off, photo caption = on. Of course you can reset these setting to create a framed
contact sheet or a larger number of photos per canvas. Note: you may want to
resize your canvas to at least 1024 x 768 for this option.
Snapshot Output File Options
- Save file as BMP - click here to save
canvas snapshots in BMP format. Note: this results in a very large file size compared to
the JPG counterpart. Unless you have a specific need for this format such as DVD or VCD
creation, it is strongly suggested that you use the JPG file format which results in a
much smaller file size.
Save File As JPG - click
here to save as JPG file format. Note: the quality setting can be adjusted to
"tweak" the final file size to your needs. Quality settings as low as 50% may
result in a very small file size but it is recommended that you do not use a quality
setting below 80% if you intend to use the canvas snapshot for any other reason that may
require higher quality transfers back to canvas.
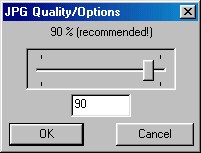
JPG Quality - To adjust
the quality setting, simply click on the quality setting button. This generates a small
popup display with a slider bar and a text edit control as shown below.
As you move the slider bar control from right to left the range of values spans from 100%
(maximum) to 5% (minimum). You can also enter any number in this range directly into the
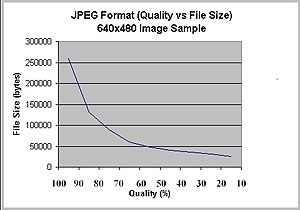
edit field below the slider bar. The graph below demonstrates a typical range of file
sizes resulting from adjusting the JPG quality settings. Compare this to the corresponding
file size for the BMP file format (844,854 bytes) for the same canvas image.
- Root File Name - enter the name for
current photo canvas series.
- Snapshot Idx - the numerical index for
the next photo sequence saved. This number is automatically advanced by 1 for each
operation.
- Path - the output file path used to
store all file write operations.
Example: suppose you had 128 Christmas
photos you wanted to resize, frame and post to the Internet. Your current settings might
be as shown in the figure below:
In this case, each file write operation will create a
unique file name using the Path = "D:\Temp\Vacation\" + Root File Name =
"Xmas" + "-" + Snapshot Idx = "0001" + Snapshot Output File
Type (Save As setting) ".jpg". The final file name series would be created as:
D:\Temp\Vacation\Xmas-0001.jpg thru D:\Temp\Vacation\Xmas-0128.jpg.
Canvas Background Colors
You have the option of setting the
background color to a solid color or a color gradient. In
the case of a color gradient, the Start Color is gradually merged with the Stop Color
using one of the user selected directional controls of either:
- Top To Bottom.
- Bottom To Top
- Left to Right
- Right to Left
Click on the Start or Stop color
boxes to change the respective colors as desired. The gradient preview window shows the
result of your current gradient selection. Turn the color gradient on or off by checking
the Use Gradient Fill Box as desired.
Frame and Photo Control
This section gives you complete control over the canvas and photo
sizes depending on your final objective. Each photo will ALWAYS maintain its individual
aspect ration no matter where or how it is placed on the canvas. This prevents distortion
of the final image, but it leaves you with some interesting choices here.
- Stretch Photo To Canvas - this option
will expand or shrink the photo image to the larger of the canvas horizontal or vertical
dimensions while maintaining the aspect ratio of the photo. Note: this option
can only be used when photos per page is set to 1.
- Stretch Canvas To Photo - this option
changes the canvas size to match the photo. If you are view large photo, you must have a
significant amount of memory for this option. Note: this option can only be
used when photos per page is set to 1.
- Use Frames - check this option to add a
built-in or user frame to enhance final appearance of your canvas. Note: if
more than one photo per page is used, the frame will be wrapped around the entire canvas.
If you do not use the stretch options described earlier, the frame will be stretched to
maintain the aspect ratio of the current photo image. This may result in excess canvas
above or below the frame. The frame is centered on the canvas in all cases.
Transparent Signature or Logo
- Add Logo - activate a user supplied
logo for this canvas.
- Transparent Color - this should be the
background color to be erased when the logo is displayed. Note: you should
stick with background colors such as black, white or blue. Depending on how your logo was
generated, you may see a faint outline around the logo. Try using 2D logos if this
presents a problem for you.
- File Name - the name of the logo to be
used. Note: only BMP file types can be used as logos.
- Location - the location for the log.
Your options are lower left, lower right, upper left and upper right. Note:
the logos are NOT stretched and are always used at full size. You should keep your logos
to less than 15% of the canvas dimensions.
Canvas Title Options
- Text Color - this sets the text color
is you use a title line for the canvas.
- Add Title - the text to be used for the
title of this canvas.
Main Dialog Buttons
- OK - close dialog and accept/activate
any changes made
- Cancel - ignore changes made. Note:
some changes take place immediately in which case the cancel button may not have an
effect.
- Apply - apply all changes made and
update/redraw canvas to show effect(s). Use this if you want to see the effects and are
not sure of what or how the changes may look. Note: you can also repeatedly
use this button to step thru the next photo sequences.
- Help - display this information.